Thursday, October 30, 2014

10 Commonly Overlooked Cleaning Spots

As you’re spending more time indoors, keeping your house clean might start to become more of a priority. You know the feeling: You walk into your kitchen to make dinner, light a candle, turn on some soft evening music, and muse over the joys of life. Don’t you? For busy moms and families, deep  cleaning doesn’t always get done as often as they’d like.
Because of this, many spots in the house are often overlooked. When it’s time to treat
ourself to an evening in, let’s help you make sure your home is spotless. Here are ten commonly missed areas:

Young Couple Cleaning Cleaning Modern Kitchen
The Vacuum
The vacuum is often overlooked because it is a cleaning tool. But with all the dust it sucks up, it’s easy for germs to collect and find a home here. Once in a while, give your vacuum a good disinfecting!
The Trash Can
No one wants to pay too much attention to the trash cans. Garbage is thrown away and forgotten about. But all that garbage attracts a host of bacteria, germs, and more. Especially for garbages in the kitchen where you eat and drink, when you take out the trash, remember to wipe down and disinfect the garbage can, too! It will also help eliminate some of the nasty odors that linger.
The Computer & Phones
Computers and phones come in contact with our skin on a daily basis. And yet we seldom think of keeping them clean. Whether cell phone or landline, desktop or laptop, you can keep these clean without wetting them down or damaging them. Use a disinfectant wipe that is moist but not wet, and lightly wipe them down, concentrating on the keys, and any area that touches your face. This will help prevent those nasty germs that collect from spreading between persons.
The Refrigerator
The refrigerator holds your food, and because of this deserves a lot of attention! We tend to perceive it as clean because the cold inside helps prevent the growth of germs and bacteria. However it still needs to be cleaned, both inside and out. Concentrate on the handles where you open and close, and look for discoloration both on the exterior and interior. Make sure you throw out old or moldy food, and if you find any, give the inside a good disinfecting.
Doorknobs and Handles
The doorknobs and various handles throughout your home, from drawers to cabinets, are touched regularly and by any number of people. Don’t forget to keep them clean! This is good for your health, and the overall sanitation of your home.
Air Vents
Air vents are general unseen. And as the saying goes: “Out of sight, out of mind.” Remember to clean them once in a while. Any germs that linger can be carried throughout your home as air travels through them.
Window Treatments
Whether you have curtains or blinds, dust is sure to settle in. If you have blinds, wipe them down regularly! Curtains can be washed once in a while as well. These are both often forgotten because we see them as stagnate decor, and many people don’t handle them regularly.
Toothbrush Holders & Soap Dispensers
Soap helps keep your hands clean, but what about keeping the soap dispenser clean? Don’t be fooled: Bacteria can grow in and around the soap dispenser. And the toothbrush holder by your sink? Keeping this clean will help prevent you from allowing excess germs in your mouth. Don’t allow them to buildup near objects you use for personal hygiene!
Pet Supplies
Your pets have toys, beds, dishes, and more! Remember to keep them clean. Your animals may share your bed, your couch, cuddle up to you, and more! We love them. Make sure that their supplies are clean so that they don’t carry all those germs with them.
Dish Towels & Sponges
Like vacuums, we use our dish supplies to clean, and forget about keeping them clean! Towels should be washed regularly like laundry, sponges replaced regularly, and scrubbers run through the dishwasher weekly. Doing this will keep your dishes clean when you wash them, and prevent the excess growth of bacteria in your sink.
A clean home is not only good for your health and hygiene, it helps keep your house looking better, smelling better, and overall more welcoming. When you are ready for a night in, afford yourself some added peace of mind by knowing that you’ve conquered those commonly-missed places, and your home is sanitary and clean. Remember, you and your home are worth it! To see trusted contractors who can help with your home’s upkeep, visit http://responsiblecontractors.com/!

Friday, October 24, 2014

Keeping Warm with your Fireplace

The seasons are changing, and here in the northwest you may be finding yourself turning on the heat, bundling up with more blankets, slipping on the thick socks, and making hot tea. Fall has come, and many are stocking up their fireplaces to prepare for the cold. For many this is a loved season. Cozying up by the fire brings joy! But before you cozy up too close, let’s cover some fireplace basics. While there are many benefits, we also need to look at safety and maintenance.
FireplaceSafe fireplace use starts with attention. Fireplaces will heat your home for a time, but should not be used to replace a furnace. A general rule is not to let it burn for longer than five hours at a time. Before lighting your fire, make sure the area around it is clean and safe. Check for anything flammable in the near vicinity, including rugs, curtains, stockings during Christmas, or anything that may have been left nearby by children or animals. If you haven’t lit a fire in a while, check to make sure the airflow through the chimney is safe and unblocked. You can do this by lighting a match or candle and watching the smoke rise up and out. Also, inspect your chimney. It should be checked at least once a year, or twice if you use your fireplace daily throughout fall and winter. There should be no debris such as animal nests or leaves on the cap, and no tree limbs near the chimney. Make sure there is no crumbling within the chimney, as mortar can fall into your fireplace. Here are some additional tips for safe use: As a general rule, your chimney will suck up air moving through the house. Because of this, we recommend keeping a window open or cracked to prevent smoke from building up in the room, as the cold air will go out the chimney. When lighting a fire, make wise decisions! Don’t leave the fire unattended, especially with children or pets in the house. Don’t handle logs or kindling with your hands – use fireplace tools. Also, allow sufficient time for coals to cool, up to three days, before cleaning ashes. And never use a vacuum to clean out your fireplace, as you risk sucking up live coals.
Maintenance of your fireplace is routine and can be time-efficient. Once a year, have the chimney and flue damper inspected. You can look from inside with a flashlight at the flue damper yourself. It should open, close, and seal effectively. If it doesn’t, it will allow heat to escape from the home when the fire is not being used. When you go more than a couple days without burning a fire, keep the ashes cleaned out. Clean the firebox once a week during the season you use it. A thin layer of ash is desirable, but excess buildup will clog your fireplace and escape into the air. Also keep the fireplace hearth around it clean. Lastly, use a brick cleaner on the bricks. Because bricks are porous, make sure you’re cleaning with a method designed for bricks.
Finally, to get the most heat and efficiency from your fireplace, consider these couple ideas. First, make use of your fireplace doors! They exist to reduce air that would be siphoned out the chimney. If you’re leaving a window open and desire the heat to go up, leave the fireplace doors open. Otherwise, cracking the doors slightly will prevent the air flow from funneling heavily out the chimney and allow heat to radiate into the house. Make sure you’re using a safe fireplace door, however. Doors made from tempered glass risk breaking if closed while the fire is burning. Consider ceramic doors. A cheap door will not do its job properly. Even with a good door, do not rely on them exclusively to properly heat your home. The most effective option for increasing the heat your fireplace will produce is to install a U.S. Environmental Protection Agency approved insert. Costing upwards of $3000, in the long-term, it can be a worthwhile investment in your home. Lastly, for times when your fireplace is not in use, you can purchase an inflatable plug to stop existing warm air from escaping up the chimney.
Altogether, a fireplace is an aesthetically pleasing way to help heat your home during the colder seasons. You should be confident and comfortable when making use of it, and can be if you take proper precautions! To see some of our trusted contractors or for inspection recommendations, visit responsiblecontractors.com. Happy heating!

Thursday, October 23, 2014

Spotlight On: Millworks Custom Sheds

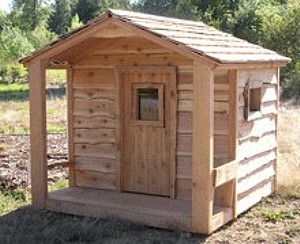
3Millworks Custom Sheds bring your unique ideas to life! Each project is an original work of art, so your imagination is the only limit. In their own words: “At Millworks Custom Sheds we build more than sheds. Our storage sheds, playhouses, garden sheds, greenhouses, chicken coops, tree houses, dog houses, play systems, and tea houses are pieces of art.”
So what sets Millworks Custom Sheds apart? Well, they bring a custom touch to every element, and use only the highest quality materials. As The News Tribune wrote: “Dan Britton has built playhouses, writing studios, painting and photography studios, and teahouses. He prides himself on using home-grade construction, such as full-size window headers, in his work.” Starting with custom lumber, milled by a local milling operation. They are also friends to the environment! All the trees used in the creation of their lumber are taken from locally sustainable forest operations, or from trees that were removed because they pose a danger to the property. They also use recycled materials whenever possible! They can take your old window or door, and repurpose it.
Owned and managed by Dan Britton, they have been doing construction for over 17 years in the greater Puget Sound Area. Dan is involved with every stage of construction, to ensure projects are completed within your time frame and to your specifications. Most projects take no more than two days to complete! One customer recently reflected: “I cannot get over the construction and the quality of the materials you used (I guess it makes a difference when you produce it yourself). It is unlike any other product I have seen on the market. It is certainly the “leader of the market”. I also appreciate your interest in using “recycled materials” such as the windows. It adds a lot of class. Lastly, you delivered exactly as promised, exactly “when” promised at a very fair cost. A true value! Hard to find in this day and age!! We can hardly wait for our upcoming greenhouse/storage shed.”
Whatever small structure you’re looking to add to your property, from playhouses for the young and young at heart, studios, potting sheds, chicken coops, teahouses to storage sheds of all sizes and types, we proudly recommend Millworks Custom Sheds! They are on the cutting edge of their market, their customer service is top notch, and their flexibility can’t be beat! Visit their site here to inquire for more specifics.
Responsible Contractors aims to bring you the best in each industry, and recommend only the most reliable companies. We know that your home is worth the best! See more of our contractors and services at: http://www.responsiblecontractors.com/

Friday, October 17, 2014

October Newsletter 2014

The October Newsletter 2014 is now available for viewing!

Spotlight on: Innovative Kitchen & Bath

cropped-IkbLogoFinal.PMS-50per-331
jpeg
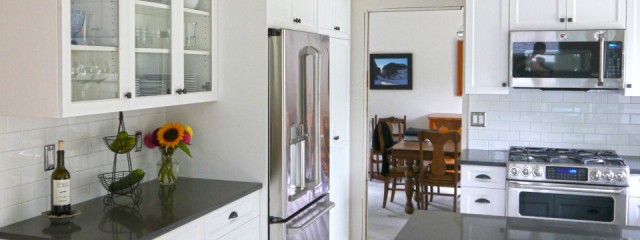
When it comes to luxury, design, and quality, there isn’t a better local choice than Innovative Kitchen & Bath. Located in Kirkland, WA, they bring twenty-eight years of knowledge, expertise and experience. The great part: Luxury doesn’t always have to break the bank! Innovative Kitchen & Bath was created with the goal of bridging the gap between general contractors working in every area to complete an average, inexpensive job without specialization, and highly specialized contractors charging significant amounts for the best in their area of expertise.
Innovative Kitchen & Bath’s tagline: “Building the kitchen and bath of your dreams” is more than a slogan; it is their conviction. Rob Watson, owner, founded his company on the belief that remodeling is more than completing a job: it is creating a home. Having personally coordinated and managed over a thousand remodeling projects, including personally designing, building and installing hundreds of them, Rob has experienced it all. He understands what homeowners go through when undergoing a remodel project in their home, and knows how to make the process as smooth as possible. As one of his customers put it: “Our whole experience with Innovative Kitchen & Bath was really rewarding. I liked the way Rob gave us the estimate, I liked his design, and I liked his crew. He's very personable, and tries to get back to you as soon as he can. The foreman of the project was also a really good guy. If any problems came up, he took care of them right away. All around, they were a very good team. The kitchen turned out even better than we expected!”
So what’s the secret? What makes these guys so good at what they do? It starts with good communication and personal attention to what a homeowner wants. Why are you remodeling? What does an investment in your home mean to you? Understanding the “why” behind it all makes all the difference! One customer recently reflected: “We went into this process not having a great idea of what we wanted but Innovative Kitchen & Bath helped us figure out the plan and how to properly utilize the space we had available. They were easy to work with and were very thorough in their process of determining our preference and what we liked down to the smallest details.” Innovative Kitchen & Bath’s personal understanding is backed by their expertise. They use only the highest quality materials, and provide them at fair market price, to work within the homeowner’s budget. To top it off, their experience in the industry allows them to quote accurately, and finish each project on time, on budget, and with no detail overlooked.
Innovative Kitchen & Bath believes in going above and beyond the minimum expectation. They exceed industry standards, provide custom designs to make your home truly one-of-a-kind, and keep overhead low. When you work with Innovative Kitchen & Bath, you know exactly who will be in your home. They coordinate, manage, and implement every aspect of the project. From the design to the construction: you’ll have someone you can trust working closely with you to make your home the best it can be!
To see more recommended contractors like this, click here for a list of our partners!

Friday, October 10, 2014

Shelf Hanging


If you find yourself needing a little extra organization, or you come down with the urge to decorate a bare wall, knowing how to hang a shelf so that it looks its best and is sturdy will be of great help! While shelf hanging is simple enough, using the right technique will make the process go more smoothly, and give you more confidence in your shelfʼs durability.

Before you hang anything, you have to know precisely where to hang it. The anchors needs to be set into a stud in the wall, or you risk tearing out sheet rock with the weight of the shelf as it tumbles to the ground. Painterʼs tape can come in handy for this, and save you from making unneeded marks on your wall. Using a stud finder, locate a stud and mark it with a small piece of tape. Locate a second one near the other end of the shelf. While there are exceptions, particularly in older houses, studs are standardly located 16” apart. If it is a particularly long shelf, continue marking each stud for the remainder of the length. Once you have all studs marked, using a level, bridge the space between them. Rather than drawing a line across the wall, you can use painterʼs tape to create a straight line that will let you see exactly where the shelf will hang.

When it comes to hanging, you have many options depending on the shelf. If you purchased a new shelf, it should have come with its own brackets. In this case, hanging is simple and will only take a few minutes. Using the marks on the tape, drill a hole in the center of each stud right above the tape and, using a hammer if necessary, lightly push the anchor into the wall. Remove tape from that side, place the bracket over the anchor, and screw it in! Repeat this for each bracket and your shelf is ready to hang!

If you built a custom shelf, or are hanging an older or used shelf that did not come with brackets, you have a few options. Toggle bolts are conventional options, that are sturdy and will support a lot of weight. The downside is that they are more difficult to install, and intended to be permanent. If you need to take the shelf down for any reason, you will need to rehang the shelf from scratch with a new pair of toggles. One liked alternative to these is Snaptoggle anchors. Designed to be moveable, you can purchase these with their own installation instructions, and, once in the wall, screw the shelf directly into the toggle. Another option is to build your own hanging rail. This is a more attractive option for those already building their own shelves. Hanging rails can be drilled directly into the wall, allowing you to place the shelf on top of it, and gives you the freedom to attach it to the rail instead of the wall itself. A similar option to hanging rails, which is convenient for hanging the more heavier shelves, is cleats. With cleats, one will be attached to the wall, and the other will be attached to the shelf. They lock into one another like puzzle pieces, and allow you to install both while the shelf is still on the ground. Then, simply place the shelf on top of the wall cleat once ready. Bulkier shelves and cabinets are good projects to consider using cleats with.

When preparing for a project, even as small as hanging shelves, having your process planned will save you hassle. Decide ahead of time which shelf youʼre using, and which hanging method you should use. Know where you want to place it, and make sure the wall youʼre attaching it to is complete. Itʼs a good idea to paint or wallpaper your wall before hanging a shelf on it. If you have any doubts about the hanging method you should use, you can either contact your shelfʼs manufacturer, or if you donʼt know who that was or are building your own shelf, you can take it into a hardware store and ask for recommendations. Happy hanging!

Saturday, October 4, 2014

Stop it, Faucet! Handling Leaks

So youʼve washed your hands, done the dishes, or brushed your teeth. You turn off the water and walk away, only to be bothered minutes later by the sound of dripping. Or maybe you noticed that your water bill this month was just a little higher than normal. Whatever the case, a faucet that leaks itʼs more than an annoyance; itʼs a waste of water. But when youʼve pushed the handle as far as you can and the leak wonʼt stop, how should you fix it? The good news is, for most faucets the solution is inexpensive and quick. Less than an hour and a small investment and you can restore your faucetʼs water stopping abilities!
FaucetBefore you begin, check your faucet type. While there are many kinds, most leaky fixtures are compression faucets. Compression faucets can be identified with separate hot and cold handles, and the pressure used to turn them off. These are older faucets, and you will feel the handle tighten as the water is turned off. Newer faucets often require specialty maintenance, however are less prone to leaks. If unsure, you can also check your manufacturerʼs website, as many of them have instructions for repair, or contact information to get specifics. The majority of leaky faucets however will prove to be a simple compression faucet, so letʼs look at repair methods for these.
The first step in repair is to turn off the water. The control for this can usually be found
under or near the sink. Once the water is off, remove the handle that is leaking. To
remove this, first locate a decorative piece that can be easily pried off usually near the
middle of the handle. There should be a screw underneath holding the valve in place.
By removing the screw, you can detach the handle by turning counter clockwise. Next,
remove the washer, which is identifiable as a rubber ring around the base. There should
be a screw holding this in place as well.
The leak will be caused by either a faulty valve, or faulty washer. When removing the handle above, simply replace the washer with a new one. You can find one at a local hardware or plumbing store. Itʼs crucial to make sure you have the right size! We recommend taking your handle with you when you purchase one. If replacing the washer doesnʼt fix it, it may be a faulty valve. Chances are your valve will need to be replaced as they corrode overtime. You can remove this with a valve seat wrench. Make sure you replace it with one of the exact same size.
If after replacing both you find that the leak has not been solved, there may be more serious issues behind the scenes. Or it may simply be that you made a mistake in the process. Donʼt worry, it happens. At this point call a plumber to have a look for you. We can recommend a trustworthy one! If you need a professional plumbing contractor, check out http://www.responsiblecontractors.com/plumbing_contractor.html! Donʼt let a leaky faucet go unchecked for too long though, as you donʼt want more significant issues to manifest down the line. And for newer faucets, or more automated systems, contact your manufacturer or a plumbing professional straightaway! Happy plumbing!